---
title: 'Build an Awesome Daisy UI WordPress Theme - Part 1'
url: 'https://www.worldoweb.co.uk/2023/awesome-daisy-ui-wordpress-theme-part-1'
markdown: 'https://www.worldoweb.co.uk/2023/awesome-daisy-ui-wordpress-theme-part-1.md'
date: '2023-09-25'
description: 'Learn how to build an awesome Daisy UI WordPress theme with this step-by-step tutorial. In this first part, we will set up our development environment and install the necessary tools to get started.'
taxonomy:
category:
- 'Web Development'
- WordPress
tag:
- PHP
- Tutorial
- CSS
- Tailwind
- 'Daisy UI'
---
# Build an Awesome Daisy UI WordPress Theme - Part 1
Published on September 25, 2023 by Tracy Ridge in [Web Development](https://www.worldoweb.co.uk/category/category:Web%20Development)
[WordPress](https://www.worldoweb.co.uk/category/category:WordPress)
Daisy UI is an awesome selection of Tailwind components for your next WordPress classic theme. You can have your custom theme up and running within a few weeks. In this multipart tutorial, we will show you first how to set up your environment to build an awesome Daisy UI WordPress theme.
- Part 1 – Setting Up – You are here
- [Part 2 – Adding Nav, Footer ](https://www.worldoweb.co.uk/2023/awesome-daisy-ui-wordpress-theme-part-2)
- [Part 3 – Mobile Friendly Navigation, Widgets](https://www.worldoweb.co.uk/2024/awesome-daisy-ui-wordpress-theme-part-3)
- [Part 4 – Post navigation, comments and Post Meta](https://www.worldoweb.co.uk/2024/awesome-daisy-ui-wordpress-theme-part-4)
## Prerequisites
Some familiarity and knowledge of the command line, PHP and the WordPress API is recommended but not essential. Please note that I am using a Mac for this tutorial so it may be slightly different for Windows or Linux users.
## Setting up a Local Development Server
Set up a local WordPress environment on your computer with [Local by Flywheel](https://www.worldoweb.co.uk/2017/flywheel-local-wordpress-development-made-easy). Follow the on-screen instructions to create a new WordPress installation and start the server.
[Download Local](https://localwp.com/)
## Download a Starter Theme
For this, I use the [blank slate](https://github.com/tidythemes/blankslate). Unzip the file and place the theme in the **wp-content** folder. Go to the WordPress Admin Dashboard and select **Appearance -> Themes** to activate the blank slate theme. We are now ready to start editing the theme.
To add content to your WordPress installation you can download an [XML theme test data file](https://github.com/WordPress/theme-test-data/tree/master). You can import it by going to the **Admin Dashboard -> Tools -> Import** and from here you can install and run the WordPress importer.
## Install a Code Editor
I will be using [Visual Studio Code](https://www.worldoweb.co.uk/2022/top-10-visual-studio-code-extensions-2022) for this tutorial. I have created a profile with a [range of extensions](https://vscode.dev/profile/github/27a6aefc7b853ac2555bba4f3ef890a6) that have been used. If you already have a favourite editor you can skip this step.
[Download VSCode](https://code.visualstudio.com/)
## Install Node
Install [Node Server](https://nodejs.org/en) on your computer. I am using a Mac so I use [Homebrew](https://brew.sh/) to install it. If you are using Windows you can install it several ways. You can download it from the Node JS homepage or through [Chocolatey](https://chocolatey.org/), a Homebrew alternative for Windows. Linux users can use their [built-in package manager](https://nodejs.org/en/download/package-manager) to download.
I also recommend NVM, a Node Version Manager where you can easily install new Node versions from the command line.
Check that you have Node installed by entering `node -v` and `which node` in the command line. Once set up, open the theme inside your code editor. We are now ready to install our scripts to help with the development.
## Install Laravel Mix
**Make sure you are in the theme directory in your code editor.** I use the built-in terminal inside of VS Code.
```bash
npm init -y
npm install laravel-mix --save-dev
```
Create an empty mix configuration file.
```bash
touch webpack.mix.js
```
You should now have the following files and folders in the root of your theme.
- `node_modules/`
- `package.json`
- `webpack.mix.js`
Open the webpack.mix.js file in your code editor and add the following:
```javascript
let mix = require("laravel-mix");
let path = require("path");
mix.setPublicPath(path.resolve("./"));
mix.js("assets/dev/js/app.js", "assets/js/app.js");
mix.postCss("assets/dev/css/index.css", "assets/css/styles.css", [
require("tailwindcss"),
]);
mix.options({
purge: {
options: {
safelist: [/data-theme$/],
},
},
});
mix.version();
```
Currently, we don’t have the assets folder setup to hold our CSS files and JavaScript so we will do that now. I like using a dev folder for all the development files, processing them into standalone CSS and JS folders to use with the theme.
Here is a one-liner to create your directory structure in the terminal.
```bash
mkdir -p {assets/dev/js,assets/dev/css,assets/css,assets/js}
```
Here is another one-liner to create the files to go inside of them.
```bash
touch {assets/dev/js/app.js,assets/js/app.js,assets/dev/css/index.css,assets/css/styles.css}
```
In package.json let’s add the scripts to run Laravel mix. This may already be added. It should look a little like this.
```json
{
"name": "wow-daisyui",
"version": "1.0.0",
"description": "=== BlankSlate ===",
"main": "index.js",
"scripts": {
"development": "mix",
"watch": "mix watch",
"watch-poll": "mix watch -- --watch-options-poll=1000",
"hot": "mix watch --hot",
"production": "mix --production"
},
"keywords": [],
"author": "",
"license": "ISC",
"devDependencies": {
"laravel-mix": "^6.0.49",
"postcss": "^8.4.28"
}
}
```
## Setup Our Theme to Use our CSS and JS Files
We need to tell our WordPress installation to use the files we have just created. Go to functions.php and search for **blankslate\_enqueue()**. Inside of this function underneath the opening curly brace ({) we need to add the following.
```php
wp_enqueue_style('style', get_template_directory_uri().'/assets/css/styles.css');
wp_enqueue_script('index', get_template_directory_uri().'/assets/js/app.js', '', false, true);
```
Here you can disable the built-in styles by putting // in front of wp\_enqueue\_style(‘blankslate-style’, get\_stylesheet\_uri());
The function should look like this now.
```php
add_action('wp_enqueue_scripts', 'blankslate_enqueue');
function blankslate_enqueue() {
wp_enqueue_style('style', get_template_directory_uri().'/assets/css/styles.css');
wp_enqueue_script('index', get_template_directory_uri().'/assets/js/app.js', '', false, true);
// wp_enqueue_style('blankslate-style', get_stylesheet_uri());
wp_enqueue_script('jquery');
}
```
## Install Tailwind and Daisy UI
Now we have to install [Tailwind](https://tailwindcss.com/) and [Daisy UI](https://daisyui.com/). Enter the following in the terminal:
```bash
npm install -D tailwindcss postcss autoprefixer
npx tailwindcss init
```
Let us edit the Tailwind configuration file to process PHP and JS files. Add the following to tailwind.config.js.
```javascript
//@type {import('tailwindcss').Config}
module.exports = {
content: ["./*.php", "./*/*.php", "./*/*/*.php", "./assets/dev/js/*.js"],
theme: {
extend: {},
},
plugins: [],
};
```
Navigate to the assets/dev/css folder. Open the CSS file called **index.css** in your editor and add the following Tailwind directives.
```css
@tailwind base;
@tailwind components;
@tailwind utilities;
```
Before installing Daisy UI we can test that Tailwind is working correctly. Open up **page.php** and you see the `` HTML element.
```php
```
Change it to
```php
```
## Run Laravel Mix
In your terminal enter the following.
```bash
npx mix
```
Alternatively, You may have a section in your sidebar which shows a list of scripts.
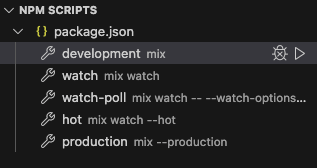You can also click on the watch option which will recompile when you make any file changes. However, this is buggy as my files are uploaded to iCloud.
You should get a message saying that webpack has compiled successfully and an output of the files and their sizes. If you look at your WordPress site it will look like a blank state.
## Install Daisy UI
Enter the following in the terminal.
```bash
npm i -D daisyui@latest
```
Update webpack.mix.js to include Daisy.
```javascript
//@type {import('tailwindcss').Config}
module.exports = {
content: ["./*.php", "./*/*.php", "./*/*/*.php", "./assets/dev/js/*.js"],
theme: {
extend: {},
},
plugins: [require("daisyui")],
};
```
If you run `npx mix` once more and view your WordPress site you will see that it now uses the default Daisy theme. Check out the code on [GitHub](https://github.com/ridgey28/wow-daisyui).
## Conclusion – Daisy UI WordPress Theme
We now have our basic theme installed on a local development server. Over this multipart series, we will add a navigation and a footer to create our own Daisy theme. Check it out soon. In the meantime, if you have any questions please feel free to ask.
### Share
[X](https://x.com/intent/tweet?text=Build%20an%20Awesome%20Daisy%20UI%20WordPress%20Theme%20-%20Part%201&url=https%3A%2F%2Fwww.worldoweb.co.uk%2F2023%2Fawesome-daisy-ui-wordpress-theme-part-1&via=worldoweb "Share on X") [Facebook](https://www.facebook.com/sharer.php?u=https%3A%2F%2Fwww.worldoweb.co.uk%2F2023%2Fawesome-daisy-ui-wordpress-theme-part-1 "Share on Facebook") [Reddit](https://www.reddit.com/submit?url=https%3A%2F%2Fwww.worldoweb.co.uk%2F2023%2Fawesome-daisy-ui-wordpress-theme-part-1&title=Build%20an%20Awesome%20Daisy%20UI%20WordPress%20Theme%20-%20Part%201 "Share on Reddit") [LinkedIn](https://www.linkedin.com/sharing/share-offsite/?url=https%3A%2F%2Fwww.worldoweb.co.uk%2F2023%2Fawesome-daisy-ui-wordpress-theme-part-1 "Share on LinkedIn") [Bluesky](https://bsky.app/intent/compose?text=Build%20an%20Awesome%20Daisy%20UI%20WordPress%20Theme%20-%20Part%201%20https%3A%2F%2Fwww.worldoweb.co.uk%2F2023%2Fawesome-daisy-ui-wordpress-theme-part-1 "Share on Bluesky") [Email](mailto:?subject=Build%20an%20Awesome%20Daisy%20UI%20WordPress%20Theme%20-%20Part%201&body=https%3A%2F%2Fwww.worldoweb.co.uk%2F2023%2Fawesome-daisy-ui-wordpress-theme-part-1 "Share via email")
#### Tags
[ PHP](https://www.worldoweb.co.uk/tag/tag:PHP) [ Tutorial](https://www.worldoweb.co.uk/tag/tag:Tutorial) [ CSS](https://www.worldoweb.co.uk/tag/tag:CSS) [ Tailwind](https://www.worldoweb.co.uk/tag/tag:Tailwind) [ Daisy UI](https://www.worldoweb.co.uk/tag/tag:Daisy%20UI)
##### Next
[ ← Hot New Web Dev - September 2023 ](https://www.worldoweb.co.uk/2023/hot-new-web-dev-september-2023)
OR
##### Previous
[ How Image-to-Text Converter Is Beneficial for University Students → ](https://www.worldoweb.co.uk/2023/image-to-text-converter-beneficial-uni)
---
## Navigation
- Previous: [Hot New Web Dev - September 2023](https://www.worldoweb.co.uk/2023/hot-new-web-dev-september-2023.md)
- Next: [How Image-to-Text Converter Is Beneficial for University Students](https://www.worldoweb.co.uk/2023/image-to-text-converter-beneficial-uni.md)